This document outlines the structure and implementation of the dev.algo.routine full stack application backend. Specifically, this document addresses how to build and test the monolithic application backend using SpringBoot.
Initial Prototype Backend
Backend Setup
Set up Spring Boot project
- Configure from web https://start.spring.io/.
- Specifically, use this predefined configuration using java 17 and maven, adding web, data-jpa, postgresql, security, and lombok dependencies.
- Generate, download, unzip
- Import the project in your IDEA Import: Project properties > Import module
Configure PostgreSQL database
Setting up a robust database is crucial for the application. Set up PostgreSQL, a powerful open-source relational database system.
- Install PostgreSQL if not already installed
- Create a new database named
routine_db - Open the
src/main/resources/application.propertiesand add the db connection details
# DB connection
spring.datasource.url=jdbc:postgresql://localhost:5432/routine_db
spring.datasource.driver-class-name=org.postgresql.Driver

spring.jpa.hibernate.ddl-auto=update
spring.jpa.properties.hibernate.dialect= org.hibernate.dialect.PostgreSQLDialect
spring.jpa.show-sql=true

# The following line is for using Spring Profiles
spring.profiles.active=dev
Create a file application-dev.properties to store db user and password
spring.datasource.username=your_db_user
spring.datasource.password=your_db_password
Note:
- You should gitignore the
dev.properties. - In a production environment, consider using environment variables or a secure vault for sensitive information.
Create JPA entities
Entities are the backbone of our data model. They represent the structure of our database tables in Java objects.
- Create a new package
dev.algo.routine.backend.model - Create
User.java:
@Data
@Entity
@Table(name = "users")
public class User {

    @Id
    @GeneratedValue(strategy = GenerationType.IDENTITY)
    private long id;

    @Column(nullable = false, unique = true)
    private String username;

    @Column(nullable = false)
    private String password;

    @Column(nullable = false, unique = true)
    private String email;
}- Create
Task.java:
@Data
@Entity
@Table(name = "tasks")
public class Task {

    @Id
    @GeneratedValue(strategy = GenerationType.IDENTITY)
    private long id;

    @Column(nullable = false)
    private String title;

    private String description;

    @Column(nullable = false)
    private LocalDateTime dueDate;

    @ManyToOne
    @JoinColumn(name = "user_id", nullable = false)
    private User user;

    private boolean complete;
}
Note: Consider adding additional fields like createdAt and updatedAt for better tracking of records.
Implement repositories
Repositories provide an abstraction layer for database operations, allowing us to interact with our entities easily.
- Create a new package
dev.algo.routine.backend.repository - Create
UserRepository.java:
public interface UserRepository extends JpaRepository<User, Long> {
    User findByUsername(String username);
}- Create
TaskRepository.java:
public interface TaskRepository extends JpaRepository<Task, Long> {
    List<Task> findByUser(User user);
}
Note: For more complex queries, consider using @Query annotations or QueryDSL for type-safe queries.
Create services
Services encapsulate our business logic, providing a clean separation between the web layer and data access layer.
- Create a new package
dev.algo.routine.backend.service - Create
UserService.java:
@Service
public class UserService {
    private static Logger logger = LoggerFactory.getLogger(UserService.class);

    private final UserRepository userRepository;
    private final PasswordEncoder passwordEncoder;

    public UserService(UserRepository userRepository, PasswordEncoder passwordEncoder) {
        this.userRepository = userRepository;
        this.passwordEncoder = passwordEncoder;
    }

    public User createUser(User user) {
        // encode the password before saving
        user.setPassword(passwordEncoder.encode(user.getPassword()));
        return userRepository.save(user);
    }

    public User findByUsername(String username) {
        return userRepository.findByUsername(username);
    }
}- Create
TaskService.java:
@Service
public class TaskService {

    private final TaskRepository taskRepository;

    public TaskService(TaskRepository taskRepository) {
        this.taskRepository = taskRepository;
    }

    public Task createTask(Task task) {
        // Note: you might want to check the task is associated to an user,
        // or you might want to set a default deadline if the task does not have one
        return taskRepository.save(task);
    }

    public List<Task> getTaskForUser(User user){
        return taskRepository.findByUser(user);
    }

    public Task updateTask(Task task) {
        return taskRepository.save(task);
    }

    public void deleteTask(Long taskId) {
        taskRepository.deleteById(taskId);
    }
}
Note: Consider adding validation logic and error handling in these service methods for robustness.
Implement REST controllers
Controllers handle HTTP requests and responses, defining the API endpoints for our application.
- Create a new package
dev.algo.routine.backend.controller - Create
UserController.java:
@RestController
@RequestMapping("api/users")
public class UserController {

    private final UserService userService;

    public UserController(UserService userService) {
        this.userService = userService;
    }

    @PostMapping("/register")
    public ResponseEntity<User> registerUser(@RequestBody User user) {
        User createdUser = userService.createUser(user);
        return ResponseEntity.ok(createdUser);
    }
}- Create
TaskController.java:
@RestController
@RequestMapping("/api/tasks")
public class TaskController {

    private final TaskService taskService;
    private final UserService userService;

    public TaskController(TaskService taskService, UserService userService) {
        this.taskService = taskService;
        this.userService = userService;
    }

    @PostMapping
    public ResponseEntity<Task> createTask(@RequestBody Task task, Authentication authentication) {
        // Get the authenticated user
        User user = userService.findByUsername(authentication.getName());
        task.setUser(user);
        Task createdTask = taskService.createTask(task);
        return ResponseEntity.ok(createdTask);
    }

    @GetMapping
    public ResponseEntity<List<Task>> getTasks(Authentication authentication) {
        User user = userService.findByUsername(authentication.getName());
        List<Task> tasks = taskService.getTaskForUser(user);
        return ResponseEntity.ok(tasks);
    }

    @PutMapping("/{taskId}")
    public ResponseEntity<Void> deleteTask(@PathVariable Long taskId) {
        taskService.deleteTask(taskId);
        return ResponseEntity.ok().build();
    }
}
Note: Consider implementing pagination for the getTasks endpoint to handle large numbers of tasks efficiently.
Add Login Endpoint
Implement an /api/auth/login endpoint, which will allow login from the frontend
- Create
AuthController.java
@RestController
@RequestMapping("/api/auth")
public class AuthController {
    private static final Logger logger = LoggerFactory.getLogger(AuthController.class);

    private AuthenticationManager authenticationManager;
    private UserService userService;

    public AuthController(AuthenticationManager authenticationManager, UserService userService) {
        this.authenticationManager = authenticationManager;
        this.userService = userService;
    }

    @PostMapping("/login")
    public ResponseEntity<?> authenticateUser(@RequestBody LoginRequest loginRequest) {
        logger.info("Login attempt for user: " + loginRequest.getUsername());
        try {
            Authentication authentication = authenticationManager.authenticate(
                new UsernamePasswordAuthenticationToken(
                    loginRequest.getUsername(),
                    loginRequest.getPassword()
                )
            );

            SecurityContextHolder.getContext().setAuthentication(authentication);

            User user = userService.findByUsername(loginRequest.getUsername());
            logger.info("User authenticated successfully: {}", user.getUsername());

            Map<String, String> response = new HashMap<>();
            response.put("token", "dummy-token");// Replace with JWT in production
            response.put("username", user.getUsername());

            return ResponseEntity.ok(response);
        } catch (AuthenticationException e) {
            logger.error("Authentication failed for user: " + loginRequest.getUsername());
            return ResponseEntity.status(HttpStatus.UNAUTHORIZED)
                    .body("Invalid username or password");
        }
    }
}

@Data
class LoginRequest {
    private String username;
    private String password;
}
Implement basic Spring Security configuration
Security is crucial for any application. Here, we set up basic authentication and authorization rules.
- Create a new package
dev.algo.routine.backend.config - Create
SecurityConfig.java:
@Configuration
@Profile({"dev", "test"})
@EnableWebSecurity
public class SecurityConfig {

    @Bean
    public SecurityFilterChain securityFilterChain(HttpSecurity http) throws Exception {
        http
                .csrf(AbstractHttpConfigurer::disable) // Disable CSRF for simplicity. Enable in production.
                .cors( cors -> cors.configurationSource(corsConfigurationSource()))
                .authorizeHttpRequests(auth -> auth
                        .requestMatchers("/api/users/register", "/api/auth/login").permitAll()
                        .requestMatchers("/api/tasks/**").authenticated()
                        .anyRequest().authenticated()
                )
                .httpBasic( httpBasic -> {}); // Use HTTP Basic Authentication
        return http.build();
    }

    @Bean
    public PasswordEncoder passwordEncoder() {
        return new BCryptPasswordEncoder();
    }

    @Bean
    public AuthenticationManager authenticationManager(AuthenticationConfiguration authenticationConfiguration) throws Exception {
        return authenticationConfiguration.getAuthenticationManager();
    }

    @Bean
    public CorsConfigurationSource corsConfigurationSource() {
        CorsConfiguration configuration = new CorsConfiguration();
        configuration.setAllowedOrigins(Arrays.asList("http://localhost:3000"));// allow origin: react dev server
        configuration.setAllowedMethods(Arrays.asList("GET", "POST", "PUT", "DELETE", "OPTIONS"));
        configuration.setAllowedHeaders(Arrays.asList("Authorization", "Content-Type"));
        configuration.setExposedHeaders(Arrays.asList("Authorization"));// headers the browser can access
        configuration.setAllowCredentials(true);
        configuration.setMaxAge(3600L);// how long browser should cache CORS configuration (seconds)
        UrlBasedCorsConfigurationSource source = new UrlBasedCorsConfigurationSource();
        source.registerCorsConfiguration("/**", configuration); // CORS config applied to all paths
        return source;
    }
}- Create
CustomUserDetailsService.java:
@Service
public class CustomUserDetailsService implements UserDetailsService {

    private final UserService userService;

    public CustomUserDetailsService(UserService userService) {
        this.userService = userService;
    }

    @Override
    public UserDetails loadUserByUsername(String username) throws UsernameNotFoundException {
        User user = userService.findByUsername(username);
        if(user == null) {
            throw new UsernameNotFoundException("User not found with username: " + username);
        }
        // Convert our custom User to Spring's UserDetails
        return org.springframework.security.core.userdetails.User
                .withUsername(user.getUsername())
                .password(user.getPassword())
                .roles("USER")
                .build();
    }
}
Note:
- For production, consider implementing JWT (JSON Web Tokens) for stateless authentication and more granular authorization rules.
- SecurityConfig configures CORS, enable unauthenticated access to register and login endpoints, and authenticated access to tasks endpoints
Running the Backend
To run the application:
- Ensure PostgreSQL is running and the database is created
- Run the Spring Boot application
- The API will be available at
http://localhost:8080
mvn clean install -U
mvn spring-boot:run
API Endpoints
When the backend is running, you can test the endpoints with a tool like Postman:
- POST
/api/users/register: Register a new user - POST
/api/tasks: Create a new task - GET
/api/tasks: Get all tasks for the authenticated user - PUT
/api/tasks/{id}: Update a task - DELETE
/api/tasks/{id}: Delete a task
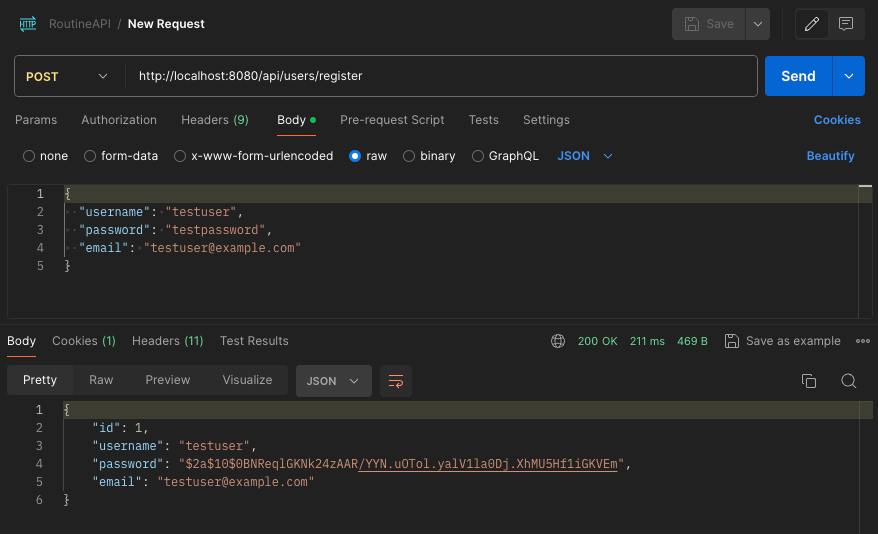
Example: Use Postman to send a POST request to http://localhost:8080/api/users/register with a JSON body like this:
{
  "username": "testuser",
  "password": "testpassword",
  "email": "testuser@example.com"
}
The result should look like this image

If the user registration is successful, you should be able to use these credentials to log in at the browser prompt. So, access https://localhost8080 and login with testuser:testpassword
Notes
Remember to implement proper error handling, validation, and testing for a production-ready application.


0 Comments